はじめに
Firewallの検証をするためVyOS1.4を仮想環境にインストールすることにします。
環境
- VMware Workstation 16 Pro
- vyos-1.4-rolling-202212100319-amd64.iso
インストール方法
公式サイトから最新のisoファイルをダウンロードします。
https://vyos.net/get/nightly-builds/
VMware Workstation 16 Proを起動します。
メニューバーから[ファイル]-[新しい仮想マシン]をクリックします。
「標準」をチェックし「次へ」ボタンをクリックします。
「インストーラディスクイメージファイル」をチェックし、ダウンロードしたisoファイルを選択します。「次へ」ボタンをクリックします。
「Linux」をチェックし、バージョンは「Debian 10.x 64ビット」を選択します。「次へ」ボタンをクリックします。
仮想マシンの名前は以下の通り入力し、「次へ」ボタンをクリックします。
仮想マシン名:vyos1.4(202212100319)
場所:任意のパスを指定して下さい。
ディスク容量の指定は以下の通り入力し、「次へ」ボタンをクリックします。
ディスク最大サイズ:4
仮想ディスクを単一ファイルとして格納:チェックを入れる
「ハードウェアをカスタマイズ」ボタンをクリックします。メモリ容量を「1024」にして「閉じる」ボタンをクリックします。「完了」ボタンをクリックします。
初期設定
VyOSをパワーオンします。ローカルのディスクからブートするように設定します。
vyos@vyos:~$ install image
Welcome to the VyOS install program. This script
will walk you through the process of installing the
VyOS image to a local hard drive.

■インストールを継続するか確認されます。そのままEnterキーを押下します。
Would you like to continue? (Yes/No) [Yes]:
Probing drives: OK
The VyOS image will require a minimum 2000MB root.
Would you like me to try to partition a drive automatically
or would you rather partition it manually with parted?  If
you have already setup your partitions, you may skip this step

■ディスクパーティションの設定です。今回は自動で設定するのでそのままEnterキーを押下します。
Partition (Auto/Parted/Skip) [Auto]:

I found the following drives on your system:
 sda    4294MB

■インストール先の確認です。Enterキーを押下します。
Install the image on? [sda]:
This will destroy all data on /dev/sda.

■インストール先の再確認です。デフォルトがNoになっているので「yes」と入力しEnterキーを押下します。
Continue? (Yes/No) [No]: yes

Looking for pre-existing RAID groups...none found.

■ルートパーティションのサイズを確認されます。Enterキーを押下します。
How big of a root partition should I create? (2000MB - 4294MB) [4294]MB:

Creating filesystem on /dev/sda1: OK
Done!
Mounting /dev/sda1...

■イメージ名を確認されます。Enterキーを押下します。
What would you like to name this image? [1.4-rolling-202212100319]:
OK.  This image will be named: 1.4-rolling-202212100319
Copying squashfs image...
Copying kernel and initrd images...
Done!
I found the following configuration files:
    /opt/vyatta/etc/config/config.boot
    /opt/vyatta/etc/config.boot.default

■sdaにコピーするファイルを確認されます。Enterキーを押下します。
Which one should I copy to sda? [/opt/vyatta/etc/config/config.boot]:

Copying /opt/vyatta/etc/config/config.boot to sda.
Enter password for administrator account

■vyosアカウントのパスワードを入力します。
Enter password for user 'vyos':
Retype password for user 'vyos':
I need to install the GRUB boot loader.
I found the following drives on your system:
 sda    4294MB

■GRUBのパーティションを確認されます。Enterキーを押下します。
Which drive should GRUB modify the boot partition on? [sda]:

Setting up grub: OK
Done! Please reboot now.

■再起動します。
vyos@vyos:~$reboot
ログインします。デフォルトのユーザー名とパスワードは「vyos」です。
vyos login:vyos
Password:vyos
インターフェースにIPアドレスを設定し、sshが使用できるようにします。管理人の環境ではDHCPが使用できるため、IPはDHCPから取得しています。
$ configure
[edit]
vyos@vyos# set interfaces ethernet eth0 address dhcp
[edit]
vyos@vyos# set service ssh
[edit]
vyos@vyos# commit
[edit]
vyos@vyos# save
動作確認
TeraTermからsshでログインしようとしたが「認証に失敗しました。再試行してください」とメッセージが表示されてログインできず。
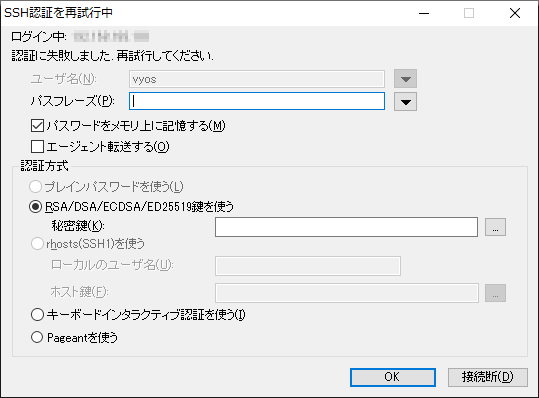
原因は特定できていないが、「キーボードインタラクティブ認証」にチェックをつけるとログインできることを確認済み。
Configは以下の通り。
vyos@vyos:~$ show configuration commands
set interfaces ethernet eth0 address 'dhcp'
set interfaces ethernet eth0 hw-id '00:0c:29:9e:eb:d4'
set interfaces loopback lo
set service ssh
set system config-management commit-revisions '100'
set system conntrack modules ftp
set system conntrack modules h323
set system conntrack modules nfs
set system conntrack modules pptp
set system conntrack modules sip
set system conntrack modules sqlnet
set system conntrack modules tftp
set system console device ttyS0 speed '115200'
set system host-name 'vyos'
set system login user user01 authentication encrypted-password '$6$.xP7o4xvgou1marP$ITDXgJhwqyTFl4/c5.6hZdD3547snoUwK3GAdKLBfHWEzHEcabzk7YhakTKA/Y7Ft7xZkasZdkAfL.u8XEGZY1'
set system login user vyos authentication encrypted-password '$6$81W6BDxqbqGXxyNw@lnsUvWHKm.SPJNzXcFF74Ut.STFM3Pfdnbg.LEJXe2BXq9TKgsll.t7X1/otCVbg3wUBARxJaXXkvNtz0vfQ3/'
set system ntp server time1.vyos.net
set system ntp server time2.vyos.net
set system ntp server time3.vyos.net
set system syslog global facility all level 'info'
set system syslog global facility protocols level 'debug'
vyos@vyos:~$

コメント